Source: Image Shack
Wednesday, September 28, 2011
Monday, September 26, 2011
Scarred
Folks, I'm struggling.
I'm struggling with my health and my self-image.
Since my surgery, my body has changed in so many ways.
If you're a guy or squimish...move on because I'm going to lay it all out.
I have a scar that goes from hip to hip.
I have a 2 scars above that.
2 more below that.
I have a scar over my belly button.
I have a scar over my right breast.
Since my surgery, I cough constantly. I'm on about 11 medications.
Steroids, inhalers, reflux medications, cough suppressants....you name it.
I'm a mess.
I don't feel pretty or sexy.
I don't want my husband to see my body.
My hormones are out-of-whack.
I'm emotional.
I'm short-tempered.
I cry sometimes.
I look at all my scars and I want to cry....and often do.
I've gained weight because I've not had the strength to exercise since May.
I make excuses to not exercise even a little. Even though I could.
My clothes don't fit and often hurt my scars.
This weekend my husband gave me an extremely genuine and thoughtful compliment.
I dismissed him. Said it wasn't true.
He looked hurt and said, "Do you honestly think I'd lie to you?"
Wow. Eye-opening.
So how do you get past an illness or surgery?
I know it takes time physically,
but emotionally--how do you get past what your body has gone through?
Saturday, September 24, 2011
Jessica Simpson Shoes
Hi, I'm over 30 (by a long shot) and I like Jessica Simpson.
Gulp.
Crickets.
Not in a creeper, get arrested way.
I like her shoes.
Well, some of them.
Not the hooker ones.
And.....I still hold out hope that she'll get back with Nick.
 |
| Saru Shoes |
Brown and gray together!
 |
| "Kit" Boot |
These are my FAVORITE. I love wedge boots! Definitely on my wish list.
 |
| "Pai" Sandal |
This color is to die for. Perfect for fall.
 |
| Tylera Boot |
Cute! I love the thicker heel on these.
I saw these in person. Very pretty!
Do you girls own any Jessica Simpson shoes?
Did you realize that as of December 2010,
Jessica Simpson Collection made $1 BILLION in sales?
Friday, September 23, 2011
Top Shop Picks
I haven't shopped at Top Shop in some time, and decided to take a gander today.
They have some great fall transition pieces out that I'm lusting over.
 |
| Brown Faux Leather Shorts |
Here's the post about my black leather shorts. Mama needs some brown ones!
I think the leather shorts would be a perfect match for this boho top!
I think the leather shorts would be a perfect match for this boho top!
 |
| Boho Embellished Tunic |
 |
| Orange Bandeau Maxi Dress |
 |
| Stick and Circle Necklace I wore so many coral and turquoise necklaces this summer, and now for the fall, I'm ready to wear some dramatic metallics. |
 |
| Mustard Ankle Grazer Trousers |
I see so many fun possibilities with these pants.
I'd pair them with an oversized turtleneck sweater or
I'd pair them with an oversized turtleneck sweater or
a loose cream racerback tank and fitted red blazer.
Throw on some wedge ankle booties.....perfection.
Or these would look great.......
 |
| Green Suede Heels |
I love that these heels aren't stripper height and what a great way to add a pop of color to a fall outfit.
Hope y'all are having a wonderful week!
XOXO
Thursday, September 22, 2011
Burlap Wreath
Yesterday I saw lots of pics of gorgeous burlap wreaths on Pinterest. However, most pictures were linked to wreaths for sale on Etsy and didn't give directions on how to make them. $70 for a burlap wreath? Um. No ma'am.
I thought, "How hard can it be?" So off to Michael's I go. I found some burlap garland at in the wreath-making supplies, but you could easily cut strips of burlap fabric. I'm all about saving some time, so I decided to use the garland. I also looked at the wreath forms and figured I'd just use a stretched out metal coat hanger and thread it through the burlap to form a "wreath".
Supplies Needed:
- 2-3 rolls of burlap garland (Michael's). I used 2, but I think 3 would be better.
- Metal coat hanger-stretched out and formed into a circle
- Decorations such as ribbon, ornaments, dried flowers, etc.
- Floral wire or hot glue to attach decorations
- Wreath hanger
Directions:
- Stretch out the metal coat hanger and form into a circle.
- Started folding burlap garland accordion-style about every 2-3 inches. This doesn't have to be exact.
- Once you've finished the folding the roll, secure with a rubber band. This makes it easier to work with and "trains" the burlap into the desired shape.
- If you notice in the picture below, I'm sitting with part of the hanger UNDER my leg to stabilize the it. This makes it a lot easier to manipulate the burlap onto the hanger. The hanger will have a "C" shape.
- Start threading the burlap onto the hanger.
- You don't have to be precise (i.e. thread it in the same spot for each fold or make it 2-3 inches each time).
- Another tip: Leave about 6 inches free at the end of the hanger (see below) . Use that length like a needle to push through the middle of each fold. Once it's "full", push the fabric down to allow for more threading.
- Keep threading until you finish the first burlap roll, then continue with the second and/or third roll.
- Here's the fun part....twisting the ends of the hanger together to form a circle. This might be where you bat your eyelashes and ask your husband or boyfriend for help:-) Be careful when twisting. The ends of the hanger can be sharp.
- Once the ends are twisted, fluff the burlap and continue to shape the hanger into a circle until you are satisfied with the shape and fullness.
- TA-DA! Pretty cool, huh? I love how organic and versatile burlap is. However, I SHO' NUF DON'T like how stinky it is. And that, my friends, is why it will go outside.
Here are some ideas on how you can decorate the wreath.
*I already had all the decorations in my holiday decorating stashes and floral arranging supplies.

Let me know if you make one! I'd love to see pics!
*I already had all the decorations in my holiday decorating stashes and floral arranging supplies.
 |
| Fall leaves tucked in the wreath |

Crow with gauzy fabric
 |
| Styrofoam skull, gauzy material, and part of last year's broken Halloween sign |
 |
| Close-up |
 |
| Christmas Ribbon with Red Bells |
 |
| Top Left-concrete mushrooms, Top Right-Gauzy Fabric and Faux Coral Bottom Left- Plain w/red ribbon, Bottom Right-Feather & succulents |
Let me know if you make one! I'd love to see pics!
Wednesday, September 21, 2011
Tuesday, September 20, 2011
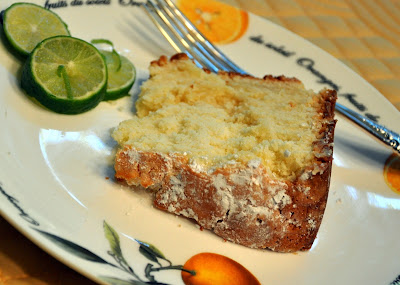
Key Lime Pound Cake
This isn't an easy cake to make. You don't just dump everything into a bowl, mix, and throw into a cake pan. But don't let it intimidate you. If you have a little time and patience, you will be rewarded with an unbelievable cake that will impress even the pickiest of eaters. The key lime flavor isn't overpowering either.
KEY LIME POUND CAKE
Adapted from a recipe by Bonnie Boland
Makes 1 (10 inch) pound cake
INGREDIENTS:
- Nonstick baking spray with flour
- 1/2 cup unsalted butter, softened
- 1/2 cup Crisco all-vegetable shortening
- 3 cups of granulated sugar
- 6 large eggs, yolks separated from whites
- 3 cups of sifted cake flour
- 1/4 teaspoon baking soda
- 1/4 teaspoon baking powder
- 1/4 teaspoon salt
- 1 cup sour cream
- 2 tablespoons lime zest (not key limes, just the regular ones)
- 1/2 cup Key lime juice
- Garnish: confectioners' sugar, lime twists, raspberries
DIRECTIONS:
- Preheat oven to 325 degrees. Spray a 10-inch tube pan with nonstick baking spray with flour.
- In a large bowl, beat butter and shortening at medium speed with an electric mixer until creamy.
- Gradually add granulated sugar, beating until fluffy.
- Add egg yolks, one at a time, beating well after each addition.
- In a large bowl, sift together cake flour, baking soda, baking powder, and salt. Gradually add flour mixture to butter mixture. Alternate adding flour mixture with sour cream, beginning and ending with flour mixture. Beat well after each addition.
- Add lime zest and juice, mixing well.
- In a separate large bowl, beat egg whites at high speed with an electric mixer until stiff peaks form.
- Gently fold egg whites into batter until well incorporated.
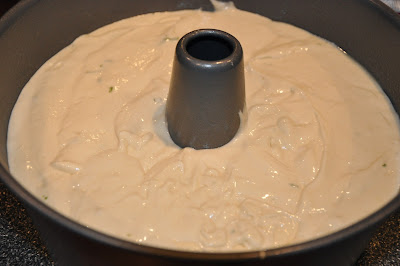
- Pour mixture into prepared pan.
- Bake for 1 hour and 30 minutes or until a wooden tooth pick inserted in center comes out clean.
- Let cake cool in pan for 10 minutes.
- Remove cake from pan, and cool completely on a wire rack. Dust cake with confectioners' sugar. Garnish with lime twists and raspberries, if desired.
**I think I may make a key lime glaze to drizzle on this. I'm guessing about a cup of confectioners' sugar mixed with 1/4-1/3 cup key lime juice would be good. Play with it and see what consistency and sweetness you would like.
HOPE YOU ENJOY!!
Monday, September 19, 2011
Forever 21 Trench
I have this awesome Tory Burch "Jim" trench that I ordered last year during one of her sale-a-poloozas. I love it, but it's a little dressy (blingin' gold buttons) for hauling the kids back and forth to school.
We've had a few days of rainy weather, so I decided to order this inexpensive Forever 21 trench. I love the ruffled asymmetrical collar and the fact this it's lightweight. Hormonal mama doesn't need any more warmth. Word.
Tory Burch "Jim" trench with tricked out gold rims
We've had a few days of rainy weather, so I decided to order this inexpensive Forever 21 trench. I love the ruffled asymmetrical collar and the fact this it's lightweight. Hormonal mama doesn't need any more warmth. Word.
Things I'm Loving
Hey everyone,
I'm slowly trying to get back to blogging. I've had several of you ask where I've been and I really appreciate you saying you've missed my blog posts. Not sure if anyone is still out there, but here goes!
*Let me preface this post by saying ALL products that I review or recommend are items I have purchased with my own money. I feel that readers cannot get a truly honest product review when items are gifted to reviewing bloggers. I have never and will never accept items from companies to "review". This is a personal opinion.
I had never used Rimmel brand until recently. I saw some of the products used in makeup demonstrations on Youtube, and thought I'd give it a whirl. I have to say, I'm really impressed with the quality and wearability of all the Rimmel products I've tried so far.
I'm slowly trying to get back to blogging. I've had several of you ask where I've been and I really appreciate you saying you've missed my blog posts. Not sure if anyone is still out there, but here goes!
*Let me preface this post by saying ALL products that I review or recommend are items I have purchased with my own money. I feel that readers cannot get a truly honest product review when items are gifted to reviewing bloggers. I have never and will never accept items from companies to "review". This is a personal opinion.
Let's get to the trivial stuff, shall we?
I had never used Rimmel brand until recently. I saw some of the products used in makeup demonstrations on Youtube, and thought I'd give it a whirl. I have to say, I'm really impressed with the quality and wearability of all the Rimmel products I've tried so far.
I am on my second tube of Glam'Eyes and 3rd Exaggerate pencil.
Yeah, that's how much I love these two products.
I use both the black and brown in the eye liner pencil.
It is waterproof, and really does stay all day.
The Glam'Eyes mascara gives you very dramatic, separated lashes.
So many mascaras clump up and make your lashes look like
spiders are fighting on your eyes.
And gurlfrand, don't get me started on all the flaking that happens with clumpy mascara.
I've had no problems with flaking with Glam'Eyes.
Curl your lashes, apply, then wait for people
to ask if you are using Latisse or have eyelash extensions.
Rimmel Lasting Finish 25 hour Foundation in Soft Beige-200
I am in LOVE with this foundation! It truly lasts all day, and the finish is lovely.
If you're looking for a long-wearing matte finish,
this would be the perfect foundation for you.
this would be the perfect foundation for you.
I don't wear this every day,
but love it when I'm going out
or will be working all day and don't have time for touch-ups.
For everyday use, I've been wearing Revlon PhotoReady Makeup in 004 Nude. It's dewy with a bit of shimmer in it, so if you prefer a matte finish you would need to set it with a powder.
I use Make Up For Ever HD High Definition Powder and really like the flawless finish I get by using both products together.
Maybelline Expert Wear shadow in "Tastefully Taupe" has been
my "go to" cheap shadow for the past few years.
It has a nice pearl finish without looking like a disco ball had a baby with Ecstasy.
I picked up this NYX Eyeshadow combo in "Rock and Roll" at Ulta the other day. LOVE it.
If you haven't tried the NYX brand, I highly recommend it. I really love the quality of their shadows.
These are Rimmel Lasting Finish lipsticks.
I like vibrant lipsticks and think both of these colors would look good on most everyone.
Have you used any of these products? Do you have something that you're just DYING to share?
Sunday, September 18, 2011
The Many Faces of Pudge
I iz so handsome.
Look ma! No ears.
I iz ashamed.
If I looks realz cute, will you give me a treat?
Why you do this to me mama?
Peekaboo!
Please quit blogging and play wif me.
Subscribe to:
Comments (Atom)


